

4.5
Owner's of the Dual GPS Receiver XDVDN9131 gave it a score of 4.5 out of 5. Here's how the scores stacked up:


5
Before You Start
• Disconnect negative battery terminal. Consult a qualified technician for instructions.
• Avoid installing the unit where it would be subject to high temperatures, such as from direct sunlight, or where it
would be subject to dust, dirt or excessive vibration.
Getting Started
• Remove 3 transit screws located on top of the unit.
• Insert the supplied keys into the slots as shown, and slide the unit out of the mounting sleeve.
• Install mounting sleeve into opening, bending tabs to secure.
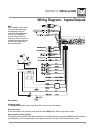
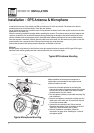
• Connect wiring harness and antenna as shown on pages 6-7. Consult a qualified technician if you are unsure.
• Certain vehicles may require an installation kit and/or wiring harness adapter (sold separately).
• Reconnect negative battery terminal, attach front panel as described on page 11 and test for correct operation.
• Snap trim ring into place making sure the notched area is on the bottom.
• Slide unit into mounting sleeve to secure.
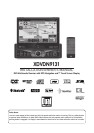
XDVDN9131 INSTALLATION
Preparation
TYPICAL FRONT-LOAD DIN MOUNTING METHOD
Mounting sleeve opening dimensions
7-3/16” x 2-1/16” (183 mm x 53 mm)


Find Your Products By Category
- Lawn and Garden
- Household Appliance
- Car Audio and Video
- Computer Equipment
- TV and Video
- Photography
- Home Audio
- Portable Media
- Automotive
- Musical Instruments & Equipment
- Communications
- Personal Care
- Marine Equipment
- Kitchen Appliance
- Baby
- Cell Phone
- Power Tools
- Video Game
- Fitness & Sports
- Laundry Appliance
- Outdoor Cooking
Please Login
