

0
Owner's of the INSTEON Home Security System INSTEON Home Security System gave it a score of 0 out of 5. Here's how the scores stacked up:


INSTEON® Wireless IP Camera
insteon.com
42
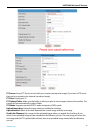
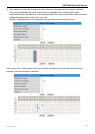
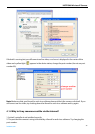
5. Enter the camera’s IP address (found in the IP Camera Tool device list) into the Server IP Address
field.
6. In the "UPD/TCP" field select "Both."
9. You will need to specify a port range to have open for your camera. 8000-8999 is a good range
to work with, but make sure the port you open does not conflict with any ports you may
already have open (from your list of Services on the "Port Forwarding" page). To enter a single
port (ex. port 8030), use the same port for "Start" and "End."
7. Click "Save Settings" and logout from the router settings page.
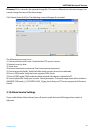
8. After making sure you are not connected to your local wireless connection, open your
smartphone’s Internet browser and enter your camera IP address followed immediately by a
colon and the port you have opened (for example http://192.168.1.4:8030). You should see the
camera login screen.
D-Link
1. Type your router’s address into an Internet browser. By default, this should be 192.168.0.1; the
information should be provided in your router’s instructions or on the router itself.
2. You will be prompted to enter a username and a password. For D-Link devices the default
username is "admin" and the password is left blank unless you have changed them previously.
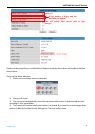
3. Once logged in, open "Advanced" and click on "Port Forwarding" in the left navigation. The
Ports window will open with information on existing HTTP and FTP ports (these are used to
connect your router to the Internet).
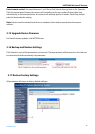
4. In the "Name" field enter a new Name, such as INSTEONIPCamera1.
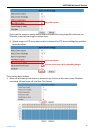
5. Enter the camera’s IP address (found in the IP Camera Tool device list) into the Server IP Address
field.
6. In the "Traffic Type" drop-down menu select "Any."
7. You will need to specify a port range to have open for your camera. 8000-8999 is a good range
to work with, but make sure the port you open does not conflict with any ports you may
already have open (from your list of Services on the "Port Forwarding" page). To enter a single
port (ex. port 8030), use the same port for "Start" and "End."
8. In the "Schedule" drop-down menu, select "Always."
9. Click "Save Settings" and logout from the router settings page.


Find Your Products By Category
- Lawn and Garden
- Household Appliance
- Car Audio and Video
- Computer Equipment
- TV and Video
- Photography
- Home Audio
- Portable Media
- Automotive
- Musical Instruments & Equipment
- Communications
- Personal Care
- Marine Equipment
- Kitchen Appliance
- Baby
- Cell Phone
- Power Tools
- Video Game
- Fitness & Sports
- Laundry Appliance
- Outdoor Cooking
Please Login
